
Introducing Forminator: A WordPress Plugin for All Your Form Building Needs

Forms are a staple of the internet. They’re how we sign up for services, log into accounts, and contact businesses. Over the years, forms have evolved to become more user-friendly and efficient than ever. Forminator WordPress Plugin is no exception.
The humble contact form has come a long way since its early days as a simple way to send an email. Nowadays, there are many form builder plugins available for WordPress that allow you to create complex forms with ease.
Gone are the days of having to code your own forms or use clunky third-party services. With a form builder plugin, you can create custom forms that perfectly match your website’s design. You can also add features like file uploads, conditional logic, Custom CSS, payments, and more.
And today we will introduce you to one such innovative WordPress form builder plugin that serves the purpose of all your form-building needs.
Introducing Forminator: A Sophisticated Form Builder Solution for WordPress User
Forminator is a comprehensive WordPress plugin that makes it easy to create, manage, and publish forms. You can quickly and easily create forms and customize them for any purpose, including contact forms, registration, surveys, quizzes, polls, and more. It is easy to use and comes with a variety of features that make it a powerful tool for form building.
With Forminator, you can create unlimited forms and publish them on your website. You can also choose to use the existing form templates that come with the plugin or import a form template from another source. The plugin has an easy-to-use dashboard & admin area that’s going to make your job as a form creator a walk in the park.
All the forms you create will look great on mobile devices, thanks to its responsive design. Your forms can be filled in and submitted anywhere on any device. Create forms in minutes with its intuitive & easy-to-use online form builder. All your online forms are stored securely on the cloud, so you can access them anytime, anywhere. Truly a complete WordPress form builder plugin that rises up to fulfill every need
Why Should You Build Your Next Form With Forminator?
Building, designing, or customizing your forms for your WordPress website can be a daunting task if you are stuck with a complex form builder. But it is not anymore with the highly customizable & user-friendly Forminator plugin that makes the workload of building any kind of form for your WordPress website a breeze.
Here are the top reasons why you should build your next form with this flexible and free form builder plugin.
- Build Any Form: Create any type of form with its easy-to-use drag-and-drop visual builder that consists of a wide range of useful form fields.
- Highly Customizable: A fully customizable form builder capable of designing any form of your imagination.
- Custom Forms: Build custom forms like polls, registration, quizzes, surveys, and more in minutes.
- Payment Option: Collect payment, donations, etc easily with its included PayPal and Stripe integrations.
- Engage & Collect Details: Accumulate information, generate leads, and engage with the visitor with ease with interactive polls, Facebook-style quizzes, and more.
- Third-party Integrations: Includes popular third-party integrations for CRM, Communication, email marketing, and project management tools like Hubspot, Slack, Mailchimp, Trello, etc.
- Develop & Sell Your Extensions: Forminator is open-source and free for all WordPress users, so anyone can create their extensions & sell them separately as their own integrations or custom apps.
- Front End Post Submission: Users can submit posts right from the front end without needing to give them access to the WordPress dashboard.
- Import Forms: Move existing forms from Contact Form 7 or import selected forms from other sources without any hassle.
- Multiple File Upload: Users can upload multiple files at once including features like setting specific file types and limiting the number of files to be uploaded.
A Live Submission Demonstration of an Application Form Created With Forminator
Wondering How Did I Create This Application Form? Here Is the Step-By-Step Guide for You!
Let me show you how easily I have created the above job application form with the Forminator WordPress plugin. Follow the below steps carefully.
First things first, make sure to install and activate the Forminator WordPress plugin before you proceed. Assuming you have the plugin installed and activated on your WordPress site, here are the steps to follow. ⤵️
Step 1: Create a Form From Dashboard
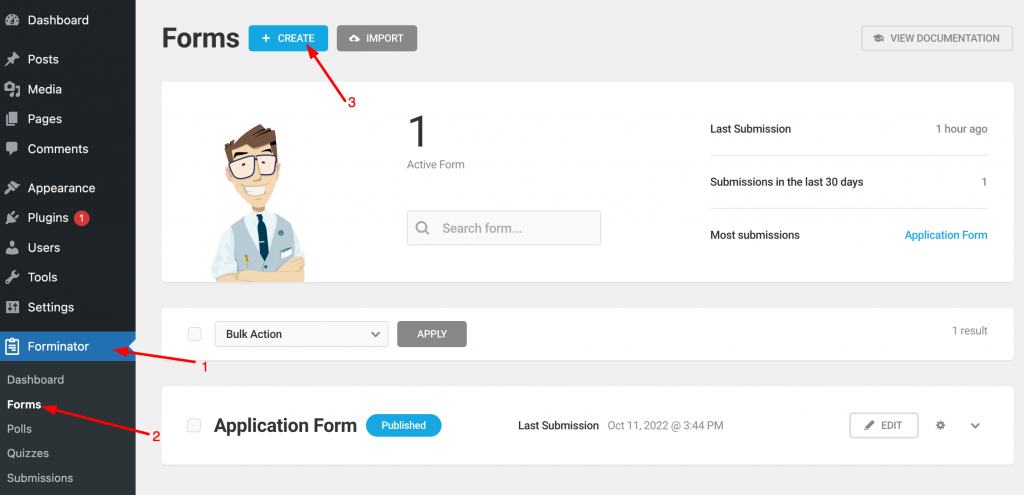
First, from your WordPress Dashboard, navigate through Forminator➔Forms and then click on +Create from your Forminator Dashboard as shown below.
Step 2: Choose From a Template
Once you click Create, a window to choose a form template will Pop-Up like the one below.
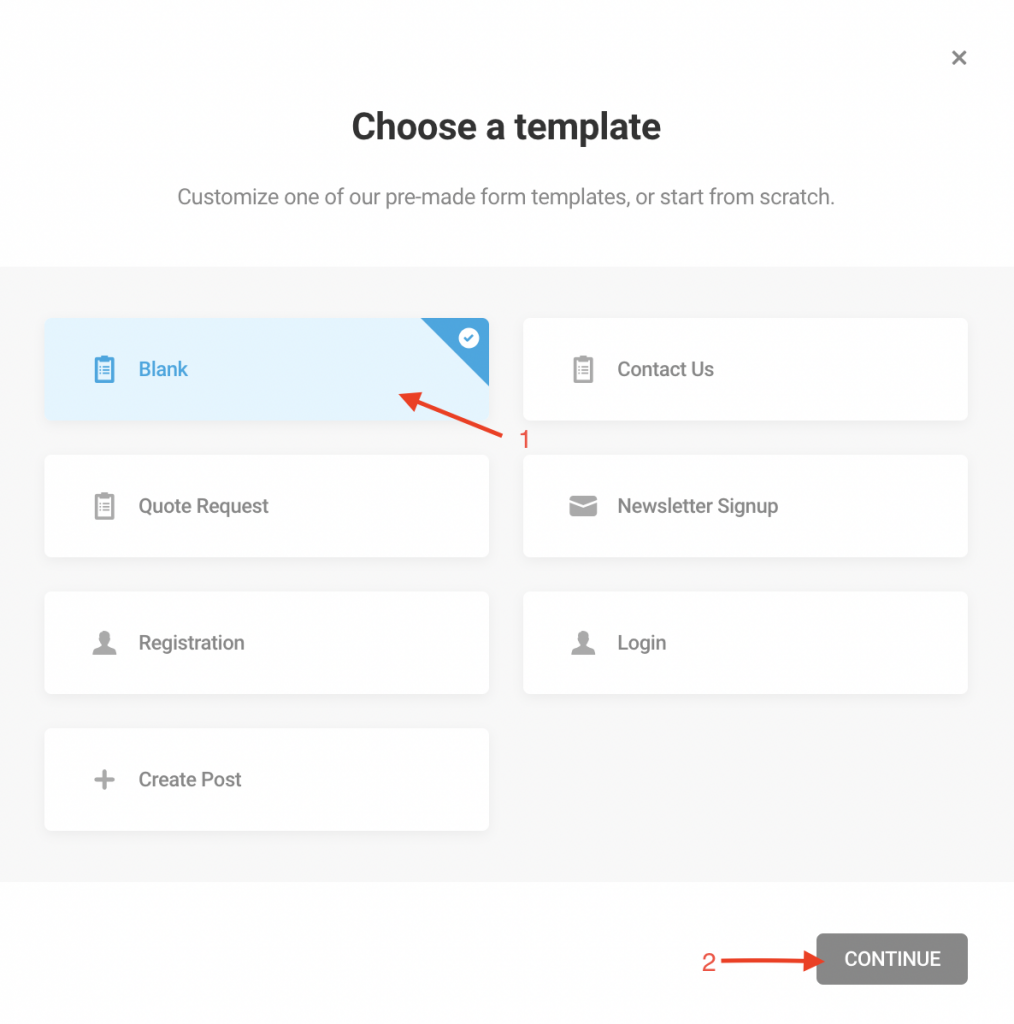
Now once this Pop-Up window shows up, you will have to choose from one of the pre-made form templates. Since I created a new form from scratch, therefore I selected Blank and pressed Continue.
Step 3: Enter a Name for Your Form
Once you click Continue, a window to name your new form will Pop-Up.
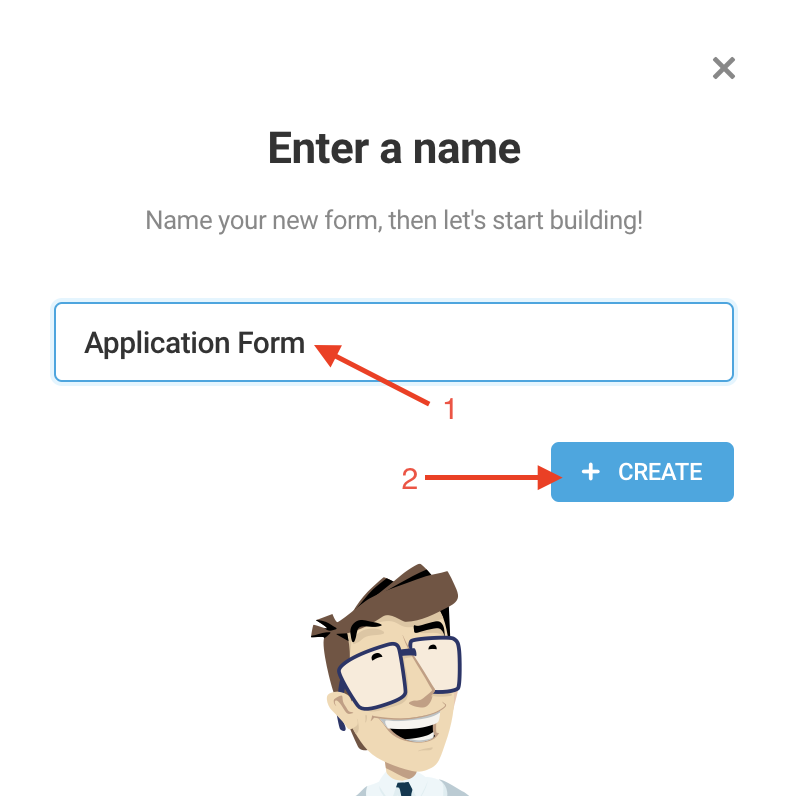
Enter a Name for your Form in the space. Since I have created an application form, therefore I have named the form ‘Application Form‘ and then pressed +Create.
Step 4: Insert Desired Form Fields
After naming your form, it’s time for you to insert all your desired form fields for your application form.
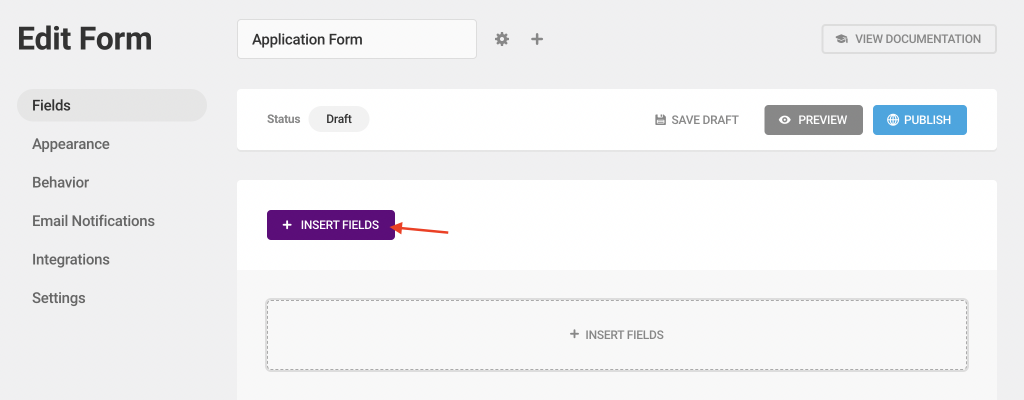
Click on INSERT FIELDS, and wait for a window like the one below to Pop-Up.
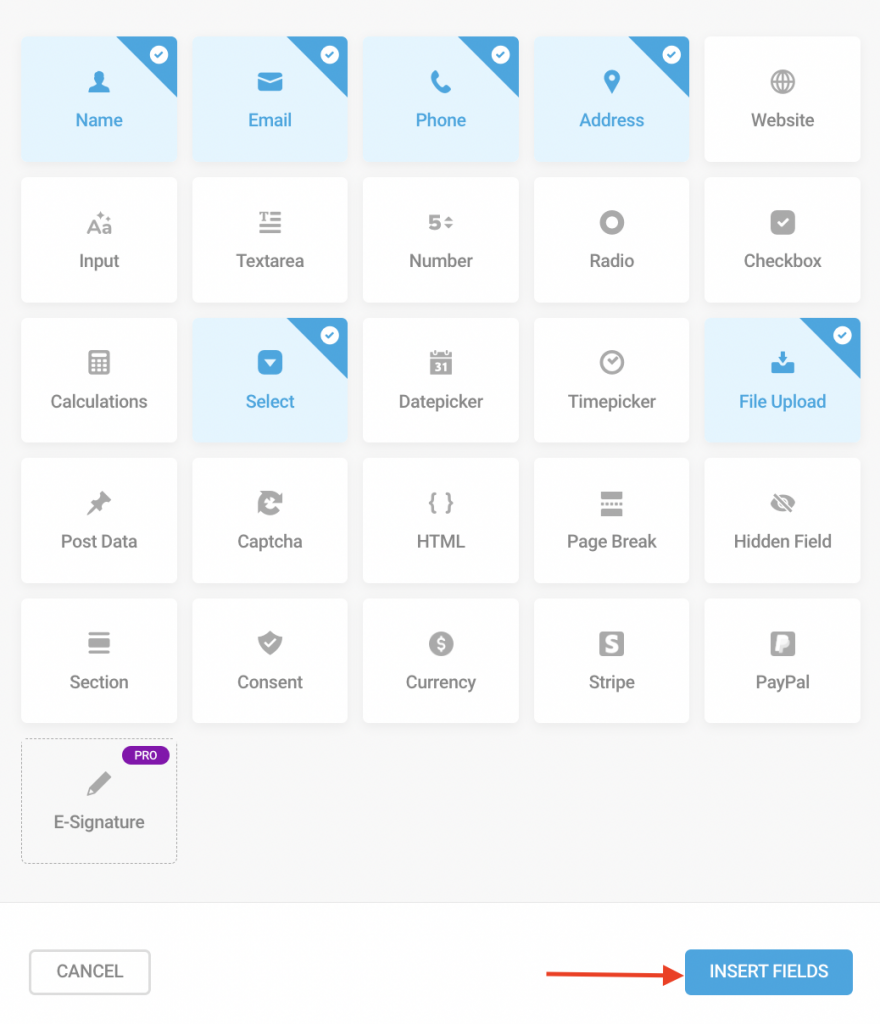
Now select your desired fields from the list. To create the application form, I selected the Name, Email, Phone, Address, Select, and File Upload fields from the above list of fields and then clicked INSERT FIELDS.
Once you finish inserting all your desired fields, you will enter the Edit Form tab like the one below with all your selected fields listed in order.
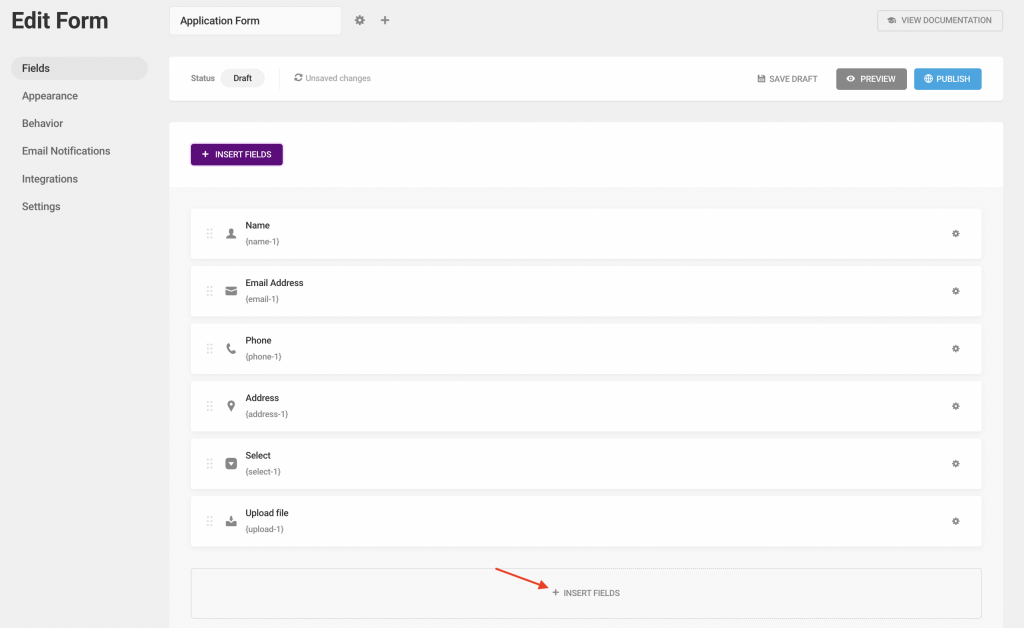
I have included two File Upload fields in the application form for two separate file upload options. So, click on INSERT FIELDS from the form editor again to add another File Upload field.
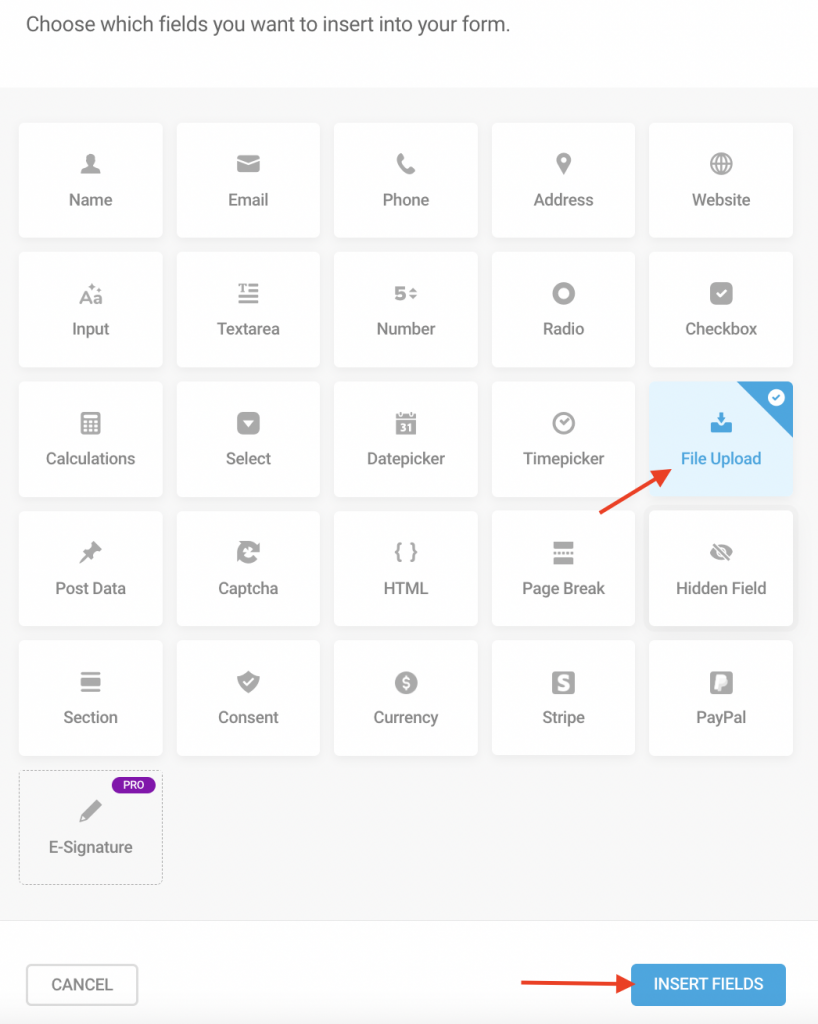
Select File Upload then press INSERT FIELDS again.
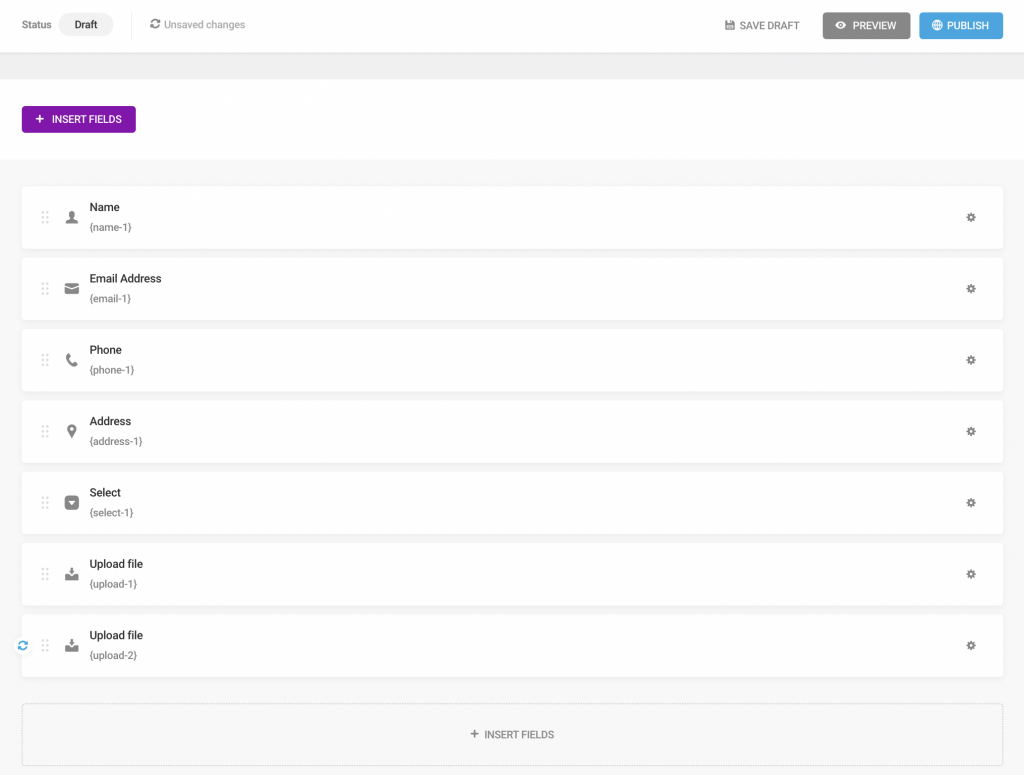
Now you can see above there are two separate Upload File fields added to the form editor.
Step 5: Change Required Field Settings
When you create an application form, you need to set a few fields to Required* so that the applicant can’t leave those fields empty while applying.
To change a form to its Required* settings, click on the field that you want to make a compulsory field to be filled while submitting the form.
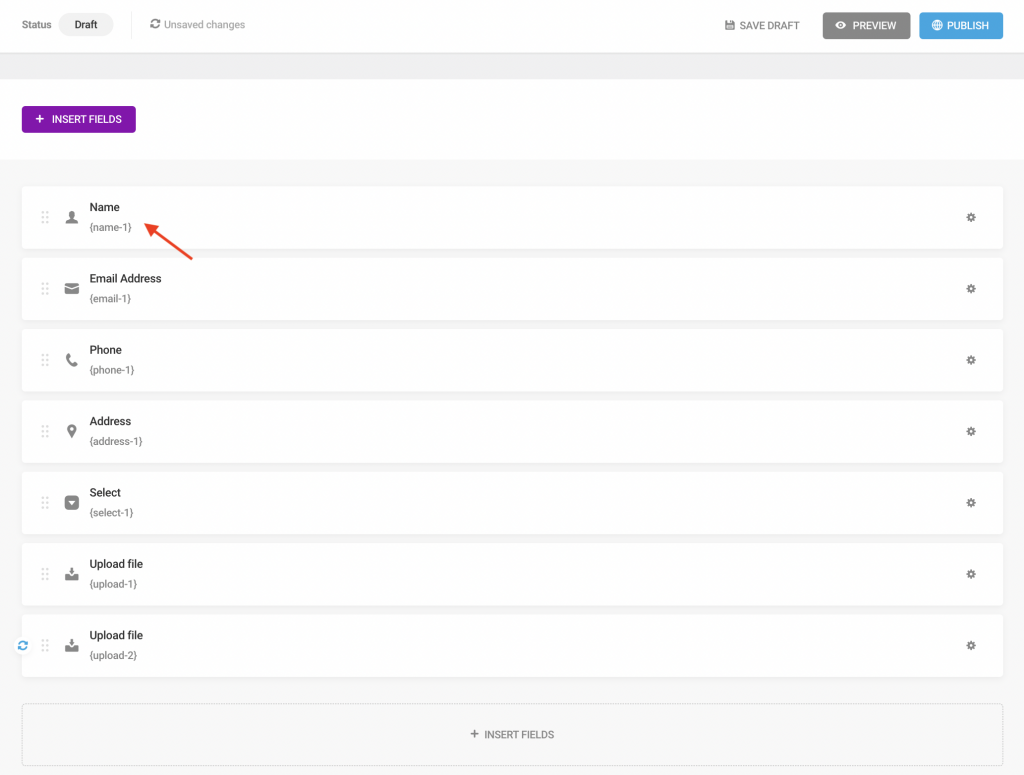
To change a field to Required*, I have clicked on the Name field.
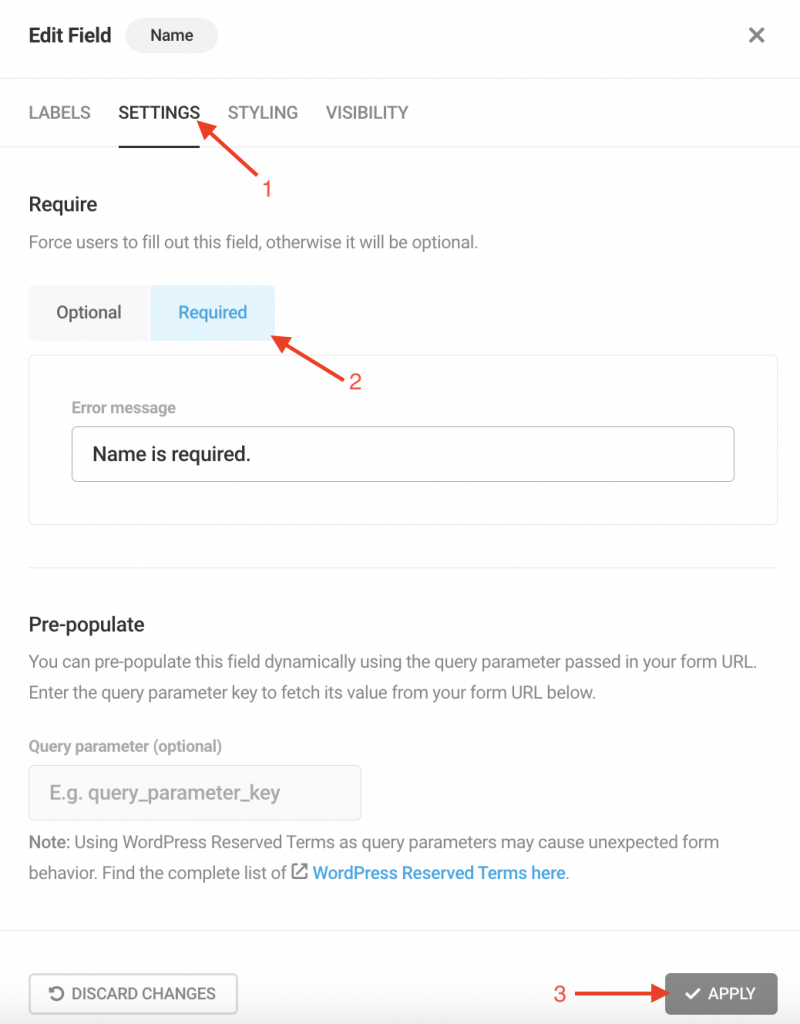
A page with Edit Field options of the Name field will Pop-Up. Then simply click on SETTINGS, tap the Required tab from Optional, and press ☑️Apply.
Now set field settings to Required* for all the other fields in the same way.
Step 6: Update Select Field Label and Options
In the application form, I have included multiple selection options by editing the Select field.
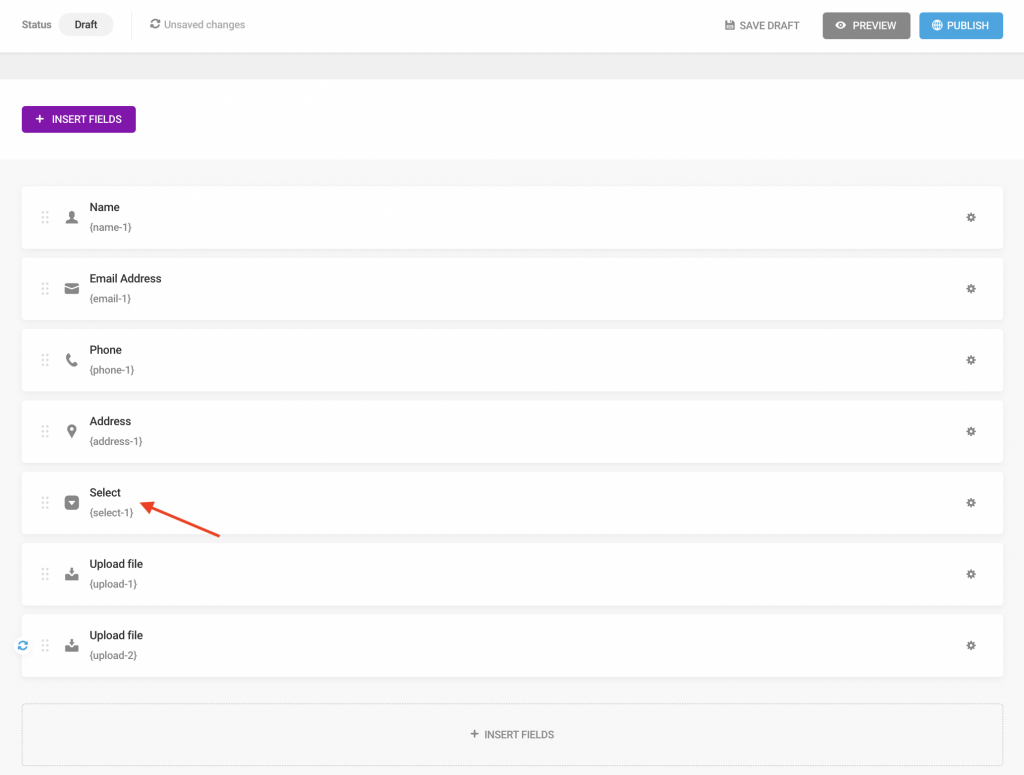
Simply click on the Select field and a page with field editing options will Pop-Up just like the one below.
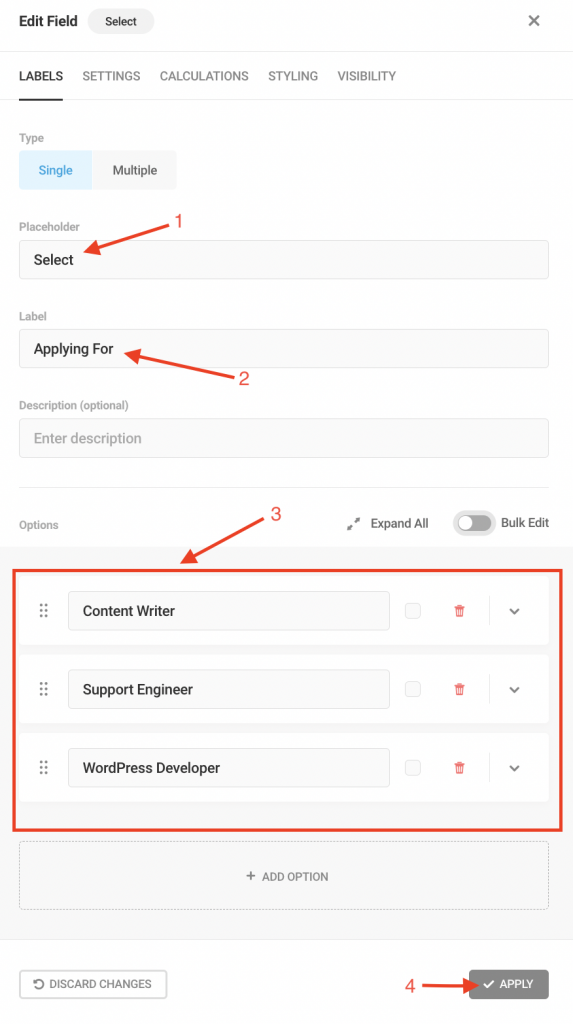
In my application form, I have updated the Select field’s Placeholder, Label and added three options, Content Writer, Support Engineer, and WordPress Developer. In the same way, update the Select field following the steps above and click ☑️Apply.
Step 7: Update the Label of Both the ‘Upload File’ Field
Just like the Select field, I have edited and changed the Label of the Upload File. Simply click on Upload File field
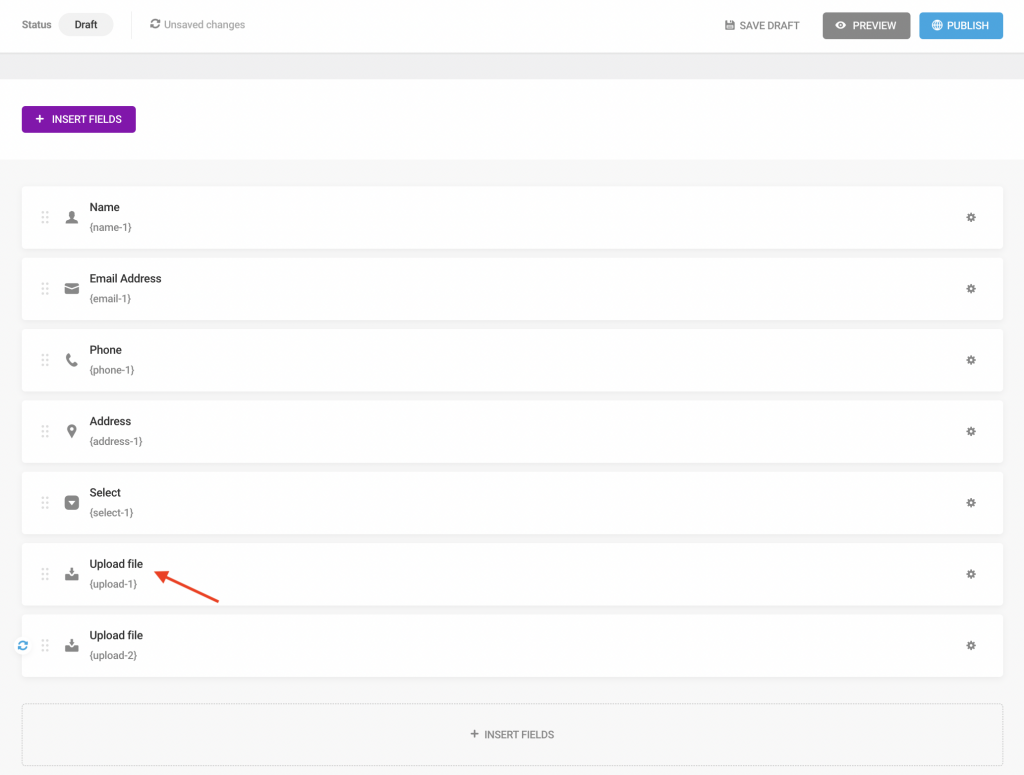
Update the Label, when the editing option page of the Upload File field Pops-Up just like the one below.
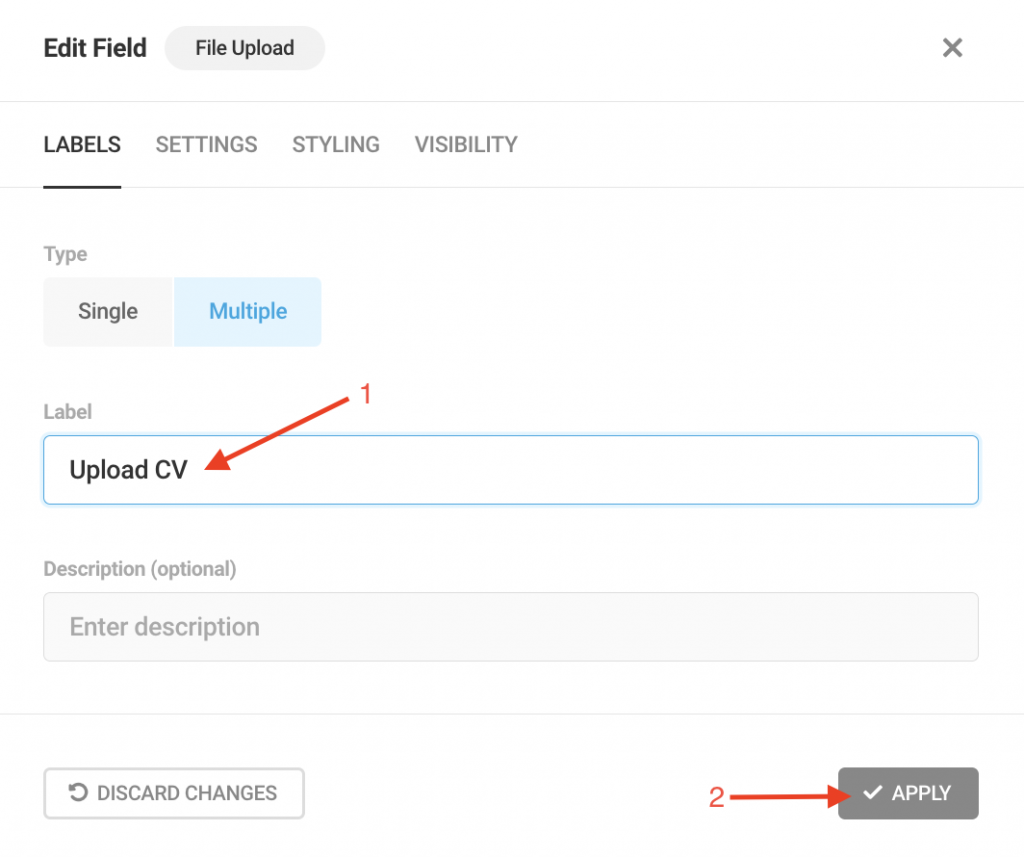
I have updated the Label with the text ‘Upload CV‘ and clicked ☑️Apply.
Now select the second Upload File field from the editor as shown below.
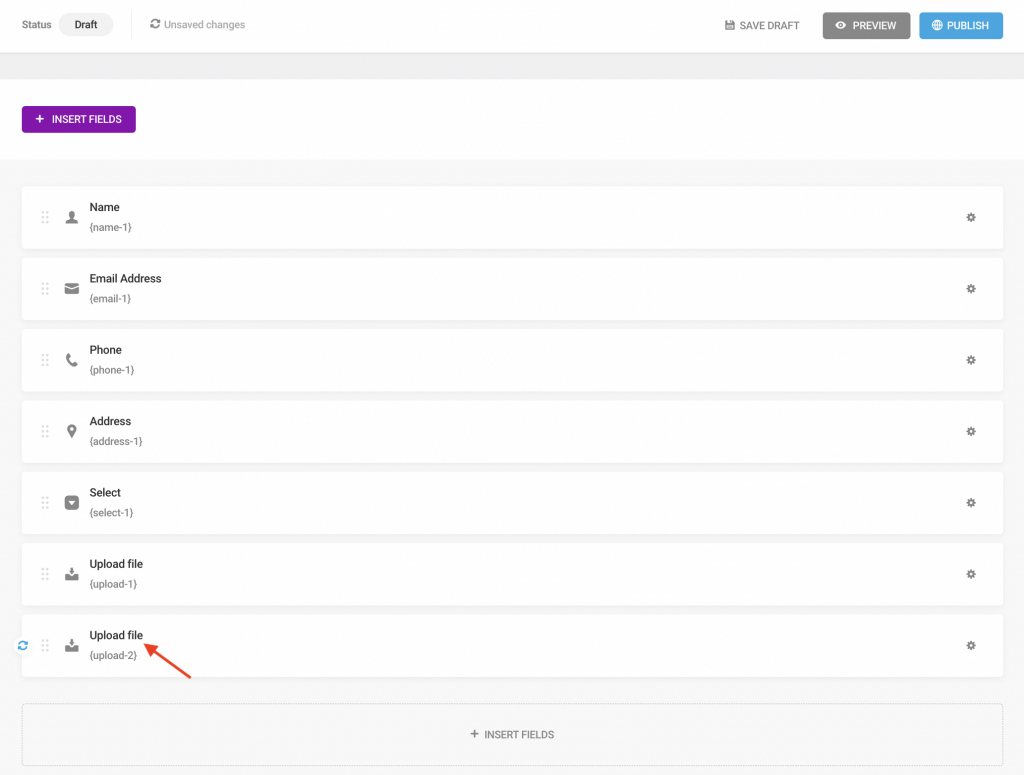
A Pop-Up page to edit and update the Label will again appear in the same way..
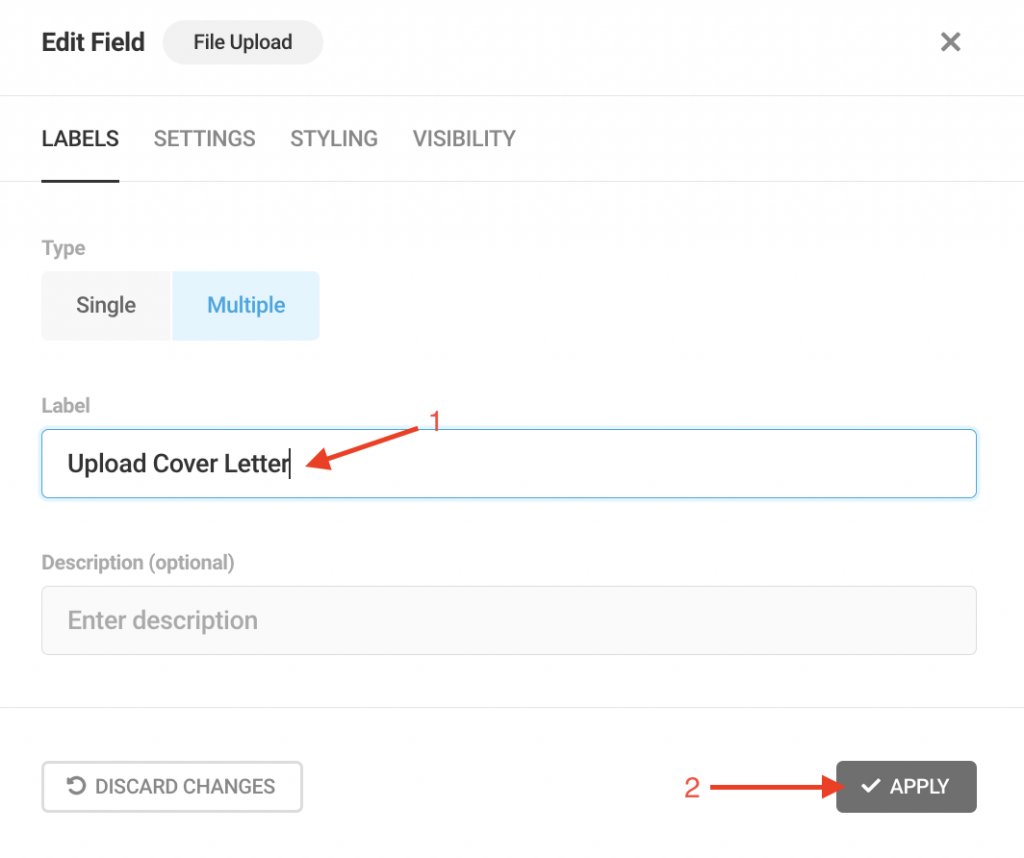
You can edit & update the Label of the second Upload File following the same method as shown above. I have updated the Label of the second Upload File with the text ‘Upload Cover Letter‘ for this one and clicked ☑️Apply.
Step 8: Update the ‘Send Message’ Button Text
By default, the form’s main button was labeled as ‘Send Message‘. Since it is an application submission form therefore you need to edit and change it. Simply click on the ☑️Send Message option placed at the bottom of the Edit Form page.

A Pop-Up page like the one below will appear in front of you.
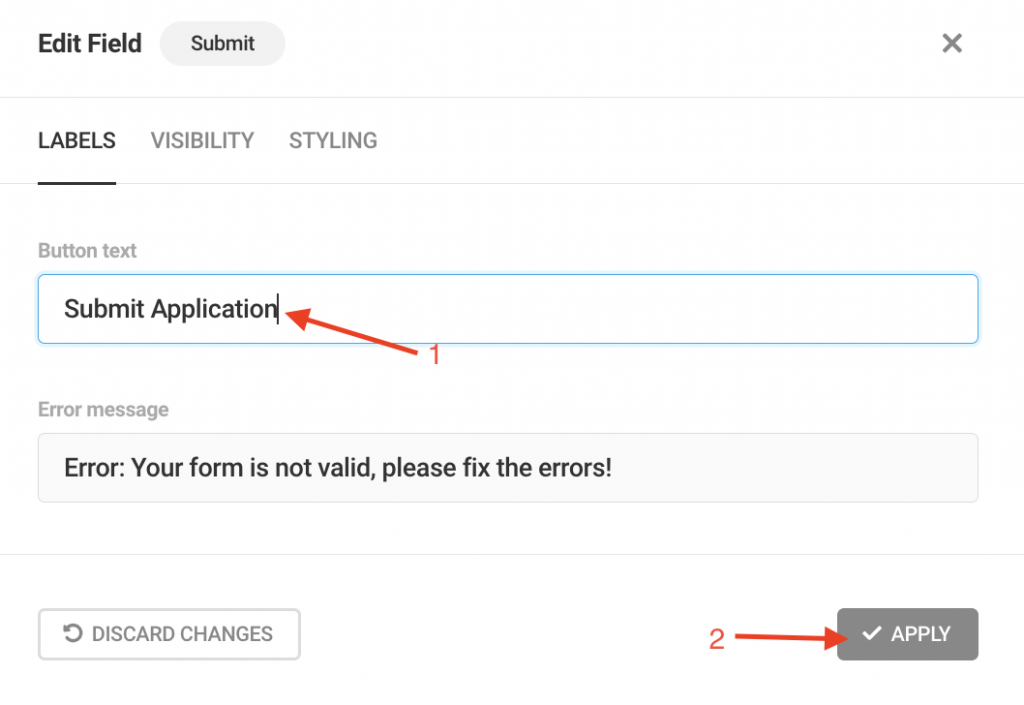
Now, simply get to the Button Text box and update the text. I have changed the text to ‘Submit Application’ and then clicked ☑️Apply.
Step 9: Preview the Generated Form
Click on the 👁PREVIEW button from the Edit Form page as shown below.
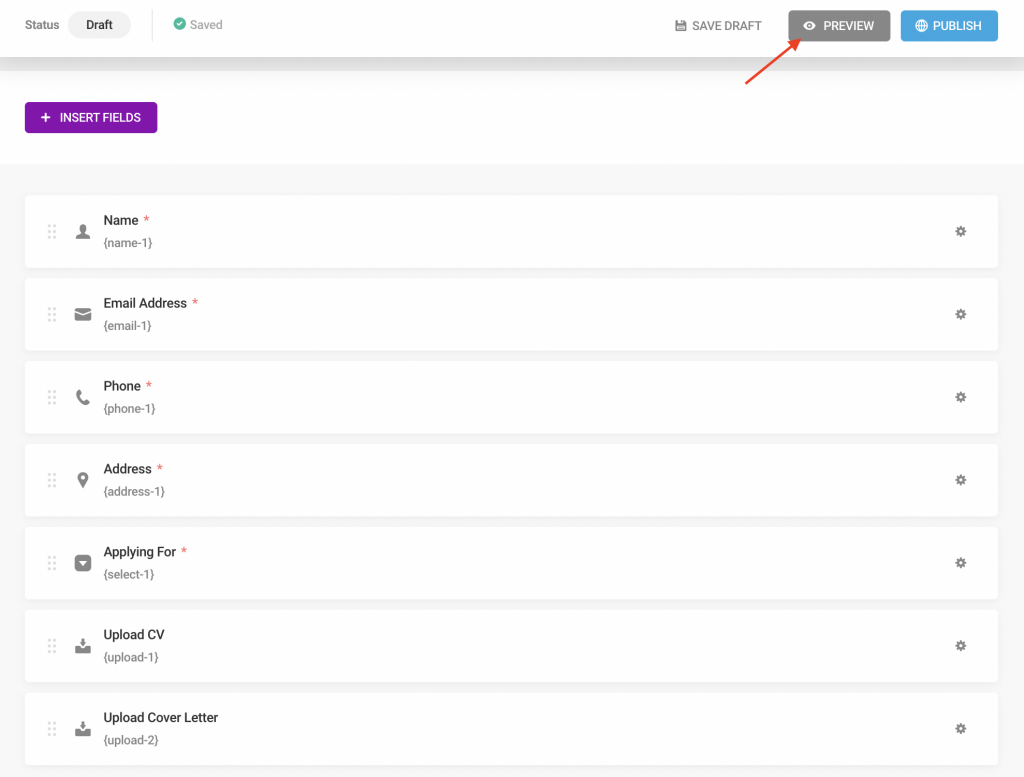
A preview of the generated form with all your selected fields and updated text will appear. Check all the fields and texts carefully to see if any further editing in the form is required.
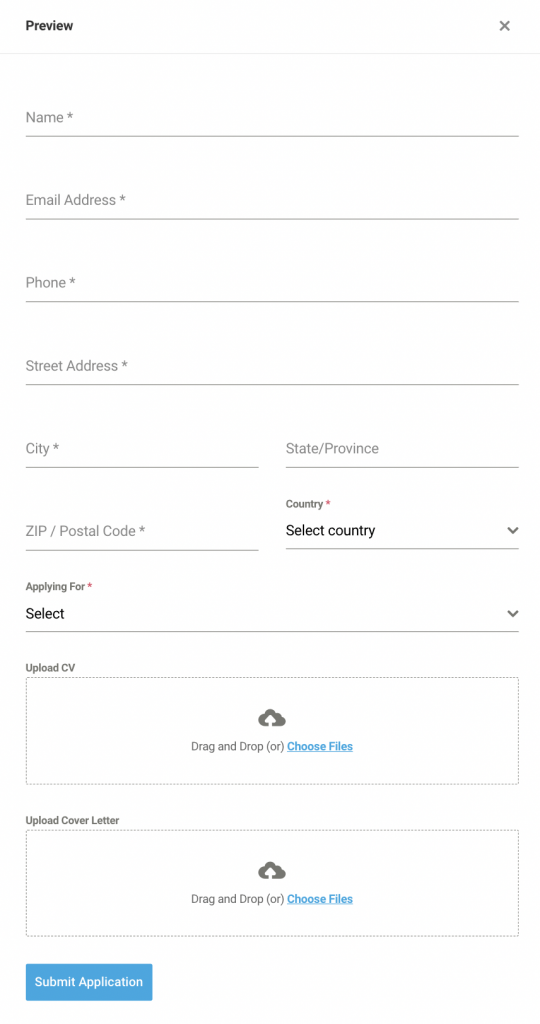
If all the fields and texts seem alright, exit the preview mode and get prepared to publish the form in the next step.
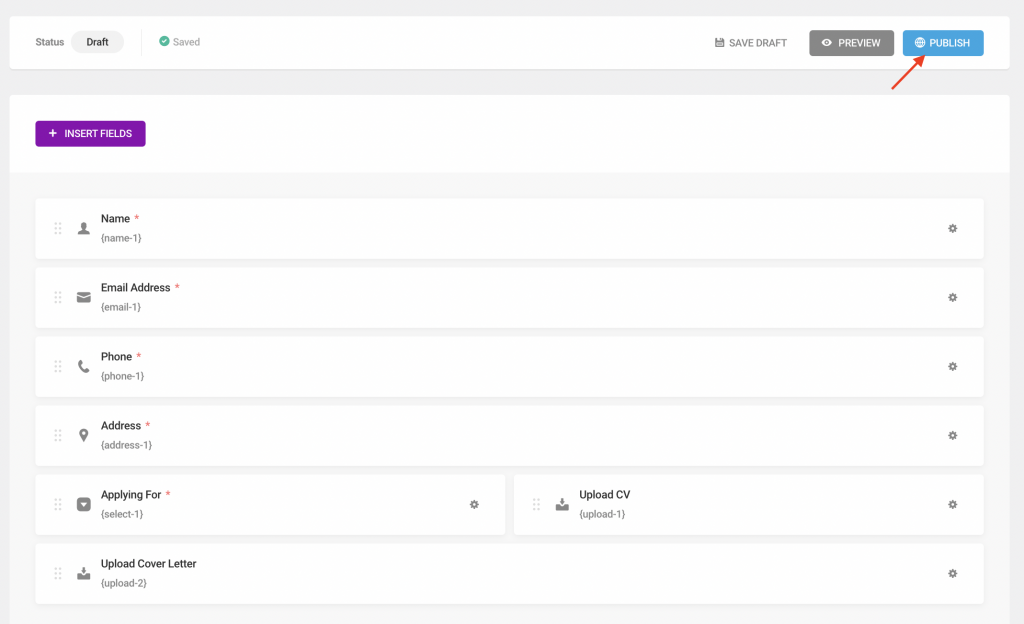
Step 10: Publish Form
Again get to the Edit Form page and click on the blue button that says ‘Publish‘ like the image below.
Step 11: Copy and Paste Shortcode on New Page
Once your page is published, Forminator will automatically generate a shortcode to embed the form into a page. Now simply copy the shortcode by clicking on copy button.
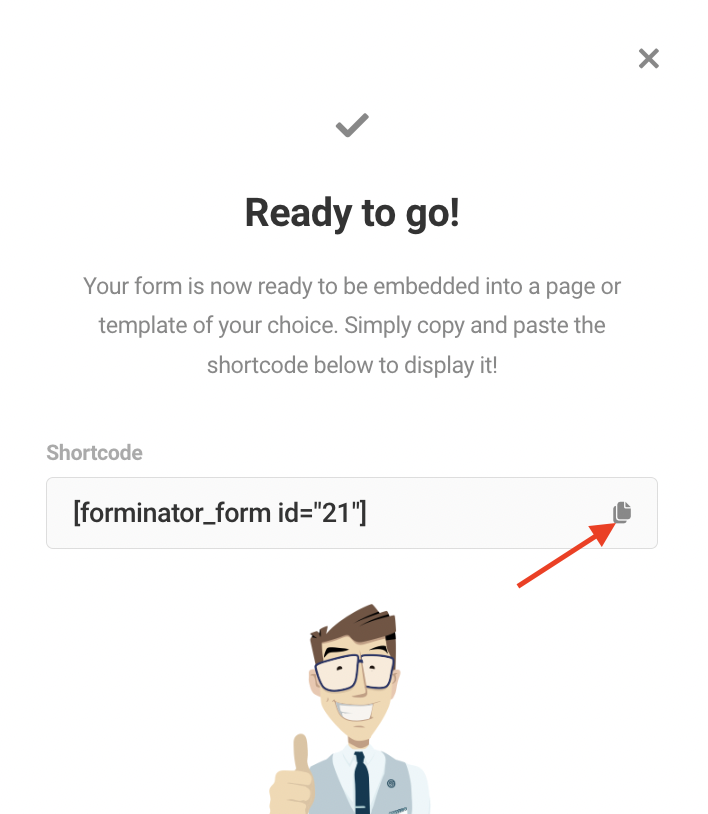
Then navigating through Pages➔Add New to create a new page.

Now simply update the Page title and paste the shortcode in the block.
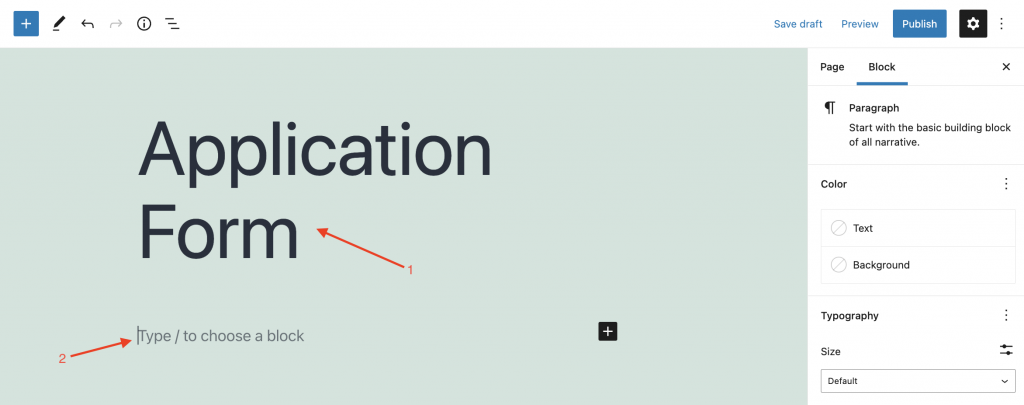
As soon as you will paste the shortcode into the page, the form you just created will magically appear on the page as seen below.
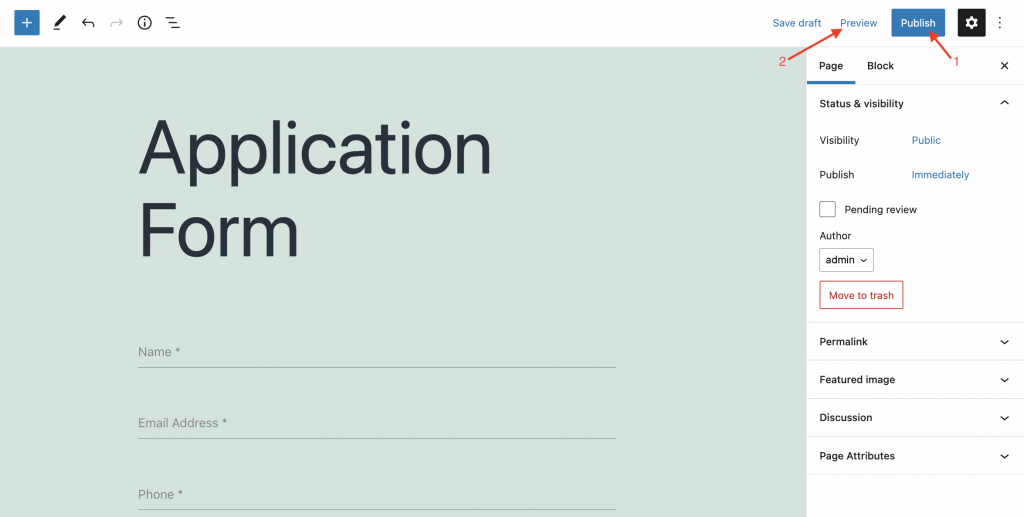
Now preview the page or publish it from your WordPress site following the steps above in the image.
Ta-da! Your application form is live and ready for use. Now anyone can submit their application using this form from this page.
Final View of The Published Form
Here is how the form looks like from the front end of the webpage.
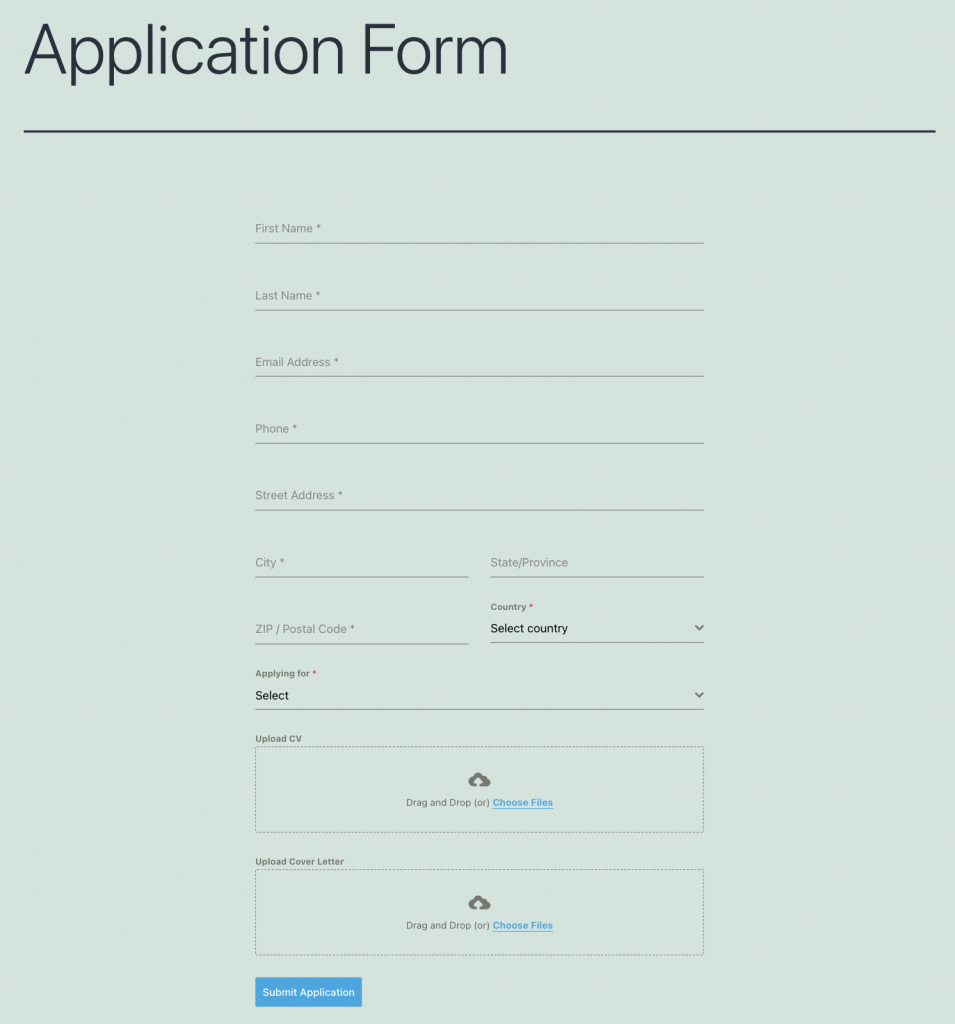
Not only application form as beautiful as this one but following the same method, with Forminator, you can virtually build and design any type of form that you can possibly imagine.
If you have any queries or need further assistance with any form creation with the Forminator WordPress plugin, feel free to reach out or let me know in the comments below.

Very good article. I absolutely love this site. Thanks!